sweet potatoes
Showing posts with label Heating Our House. Show all posts
Thursday, October 23, 2014
Pallet Trailer for Lawn Mower/Tractor
Jamey wanted something to haul things around the property. Things like firewood, produce, brush, etc. There's often room for kids as well. Working with some used pallets, some old (and new boards) and a couple bicycle wheels, he built this and it works great.
Pin It
Labels:
Crafts,
Gardens,
Heating Our House
Wednesday, June 11, 2014
Firewood Post Office
We have many stacks of wood around our place. Some are inside buildings and some are outside. One is a play house turned post office. Finding dual uses for things can be an awful lot of fun.
Pin It
Pin It
Labels:
Heating Our House,
Kids
Tuesday, January 7, 2014
Ice on the Inside
This is our dining room window this morning. What you see isn't condensation- it's ice on the inside of the window. This window and one other were deliberately deprived of their storm windows because Jamey wanted to see what our wood stove could do in very cold temperatures (it got down to around zero last night).
Despite the ice inside the house, we stayed very comfortable thanks to adding wood a couple times throughout the night. In case you're curious, very comfortable to us is mid 70's in the stove (living) room (in the middle of the night) with all the other rooms being cooler. With plenty of attention, I've been able to keep the living room around 80 today (rest of the house cooler, of course) - a treat compared to what our oil heat would have been able to do for our old house if we were still using it.
For any of you on the fence about wood heat...you'll love it. We certainly do.
All of you who live way north are amazing and much braver than I. How cold was it where you live last night? Pin It
Labels:
Heating Our House
Wednesday, November 28, 2012
Homemade Fire Starter
I was going to just show you a picture of these and ask you to guess what they are. I imagined some of you would guess bird seed/suet and others might have of thought they were some kind of high fiber snack. But instead of teasing, I decided to just come right out and tell you about these sweet little time savers.
We put in a wood stove (scroll down the link to read all the related posts) last January and love it. Like crazy. I like to say that 2012 is the year we got warm. I love having a toasty living room, comfortable school room and cool bedroom. I don't even mind tending the fire or the extra dust and mess. The warmth is worth it.
When it's really cold outside, it's just a matter of adding logs, but on sunny afternoons, the house warms and we let the stove go out at times. Re-starting the fire takes me some time. Jamey has a whole system of building a fire. Me? I'm not so gifted in the fire-building area. I know the gist of what I'm supposed to do, but no matter how much my log arrangement looks like his it never takes off and burns as nicely as his.
So, I sit in front of the fire blowing on it and adjusting the air flow, coaxing it to get going. Thinking of me, Jamey ordered a few fire starter discs to try. They burn really well on their own, ensuring that the kindling catches and get the whole stove going.
But then he read on hearth.com that you can make your own fire starters. And he did. They are awesome! I just build my fire with a starter underneath, light the starter and close the door. The starter burns for a good 10 minutes ensuring that the wood lights and I'm done! Mind you, I do keep an eye on the temperature- over-firing isn't good for anyone.
So, just in case you have a wood stove or know someone who has one (or a fireplace), here's how to make them. Did I mention they're super, super cheap and take 15 minutes or so to make?
Homemade Fire Starters
A friendly and safety-conscious reader asked that I add, "I'm asking that you add a bit on the fire hazard when melting wax. It's best done outside." Thank you, Frank!
paraffin or wax without scent or oils (Jamey found some used candles at a thrift store)
saw dust and/or wood shavings
a double boiler
egg cartons, paper towel or toilet paper rolls, or plastic containers
Melt the wax in a double boiler (the wax will wash off under hot water). Place saw dust in a plastic container. When the wax is melted, add some to the saw dust until all the saw dust looks uniformly damp. It will be very warm. Blend it well until it starts to clump together. As the wax hardens, it will help hold the starters together, but if they're too dry, they may crumble. You can also incorporate wood shavings into the mix. These are chain saw shavings and smell amazing.
1/2016 Update: We've continued to make these fire starters, sometimes adding dryer lint to the mix. We had run out of them this fall and Jamey saw some on sale at the store and bought a box thinking they'd save him a little time. I dislike the bought ones SO MUCH but we're going to use them until they run out. They just don't catch as well as the homemade version and therefore take a little while to get going. Fooey with bought starters. We're fully sold on our homemade version:-).
Next, press the mixture into your molds before they cool. Egg cartons work well. You can pack paper towel or toilet paper rolls and then cut them once cooled (the card board can then be burned with the starter or you can pop them out). You can also treat them like brownies and pat them into a container and later cut them into squares.
Let them cool completely in their molds, then remove and store somewhere handy. I think these would make very fun Christmas gifts for friends who build fires. If only I had had a festive ribbon to tie around my jar...just use your imagination:-).
We put in a wood stove (scroll down the link to read all the related posts) last January and love it. Like crazy. I like to say that 2012 is the year we got warm. I love having a toasty living room, comfortable school room and cool bedroom. I don't even mind tending the fire or the extra dust and mess. The warmth is worth it.
When it's really cold outside, it's just a matter of adding logs, but on sunny afternoons, the house warms and we let the stove go out at times. Re-starting the fire takes me some time. Jamey has a whole system of building a fire. Me? I'm not so gifted in the fire-building area. I know the gist of what I'm supposed to do, but no matter how much my log arrangement looks like his it never takes off and burns as nicely as his.
So, I sit in front of the fire blowing on it and adjusting the air flow, coaxing it to get going. Thinking of me, Jamey ordered a few fire starter discs to try. They burn really well on their own, ensuring that the kindling catches and get the whole stove going.
But then he read on hearth.com that you can make your own fire starters. And he did. They are awesome! I just build my fire with a starter underneath, light the starter and close the door. The starter burns for a good 10 minutes ensuring that the wood lights and I'm done! Mind you, I do keep an eye on the temperature- over-firing isn't good for anyone.
So, just in case you have a wood stove or know someone who has one (or a fireplace), here's how to make them. Did I mention they're super, super cheap and take 15 minutes or so to make?
How does it work? The wax lengthens the burn and it evaporates- think about how candles just disappear when burned over time.
Homemade Fire Starters
A friendly and safety-conscious reader asked that I add, "I'm asking that you add a bit on the fire hazard when melting wax. It's best done outside." Thank you, Frank!
paraffin or wax without scent or oils (Jamey found some used candles at a thrift store)
saw dust and/or wood shavings
a double boiler
egg cartons, paper towel or toilet paper rolls, or plastic containers
Melt the wax in a double boiler (the wax will wash off under hot water). Place saw dust in a plastic container. When the wax is melted, add some to the saw dust until all the saw dust looks uniformly damp. It will be very warm. Blend it well until it starts to clump together. As the wax hardens, it will help hold the starters together, but if they're too dry, they may crumble. You can also incorporate wood shavings into the mix. These are chain saw shavings and smell amazing.
1/2016 Update: We've continued to make these fire starters, sometimes adding dryer lint to the mix. We had run out of them this fall and Jamey saw some on sale at the store and bought a box thinking they'd save him a little time. I dislike the bought ones SO MUCH but we're going to use them until they run out. They just don't catch as well as the homemade version and therefore take a little while to get going. Fooey with bought starters. We're fully sold on our homemade version:-).
Next, press the mixture into your molds before they cool. Egg cartons work well. You can pack paper towel or toilet paper rolls and then cut them once cooled (the card board can then be burned with the starter or you can pop them out). You can also treat them like brownies and pat them into a container and later cut them into squares.
Let them cool completely in their molds, then remove and store somewhere handy. I think these would make very fun Christmas gifts for friends who build fires. If only I had had a festive ribbon to tie around my jar...just use your imagination:-).
Stay warm, lovelies!
Pin It
Labels:
Crafts,
Heating Our House
Thursday, May 31, 2012
Diamonds in the Rough
What do you see when you look at the photo below (other than a barn in need of repair)?
Yes, it looks like a bit of a mess. For some of you, this may be hard to look at. Some of you are used to neatly trimmed yards and are probably halfway out the door right now, weed-whacker in hand, on your way to hunt us down and take care of some things. We are happy to let parts of our property grow up instead of insisting on subduing every last square inch. What we see in the photo above is a nursery, a tree nursery.
While it is often tempting to pull out your pruning shears when a little tree starts to grow along your fences or in corners of your yard, letting them grow up and then transplanting them to other areas of your property can add to your landscaping at no cost to you. And trees are just wonderful, you know.
Here's a red bud we moved to our front yard.
Here are a cherry and mulberry tree, both of which grew up into a flowering quince bush. I'm not surprised in the least- all kinds of birds love our flowering quinces. Jamey pruned back the quince to allow the cherry and mulberry to take off. One may be transplanted out later if both continue to thrive.
Here is our large black walnut. Below it is a baby black walnut which might one day take the place of the larger one.
We have countless trees springing up everywhere here. Many will be left to grow (and may one day end up in our wood stove), others will be moved.
So next time you want to grab those shears or hack down that unruly corner of the yard, consider finding a home for young trees in your yard. They'll bring shade, attract wildlife and one day, may add wood to your (or someone else's) fire.
Pin It
Yes, it looks like a bit of a mess. For some of you, this may be hard to look at. Some of you are used to neatly trimmed yards and are probably halfway out the door right now, weed-whacker in hand, on your way to hunt us down and take care of some things. We are happy to let parts of our property grow up instead of insisting on subduing every last square inch. What we see in the photo above is a nursery, a tree nursery.
While it is often tempting to pull out your pruning shears when a little tree starts to grow along your fences or in corners of your yard, letting them grow up and then transplanting them to other areas of your property can add to your landscaping at no cost to you. And trees are just wonderful, you know.
Here's a red bud we moved to our front yard.
Here are a cherry and mulberry tree, both of which grew up into a flowering quince bush. I'm not surprised in the least- all kinds of birds love our flowering quinces. Jamey pruned back the quince to allow the cherry and mulberry to take off. One may be transplanted out later if both continue to thrive.
Here is our large black walnut. Below it is a baby black walnut which might one day take the place of the larger one.
We have countless trees springing up everywhere here. Many will be left to grow (and may one day end up in our wood stove), others will be moved.
Wednesday, March 21, 2012
Heating Our House: Blowing Insulation in Our Attic
I know this isn't a very seasonal topic for some of us. When the temps reach the upper 70's, the first thing you think about isn't usually insulation. That said, I want to get this out there and promise I'll have a much more seasonal post coming up next.
Heating Our House: The Problems
Heating Our House: The Inspection and Results
Heating Our House: Wood Stove or Outdoor Furnace?
Heating Our House: The Decision
Well. We finally got around to our last big insulating project the other weekend when Jamey's parent's were here (Thank you, Dad!). Our attic had only about 5 inches of blown insulation in it which equals an R-value of about 15. New homes require and R-value of 39 (in our area). Hmm. We were {obviously} a little lacking.
With the project finished, our new R-value is about 40 ( about 12 inches thick). Jamey and his dad also blew insulation into our kitchen's attic (the only one-story portion of the house).
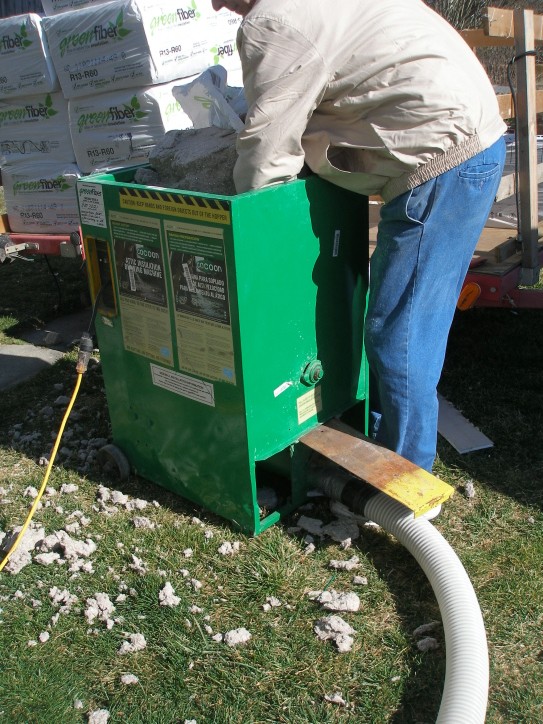
At our local Lowe's store, if you buy a certain number of bales of loose insulation, they let you borrow (yes, for free) the machine complete with hose that you use to blow it in. For our job(s), we used 35 bales. Below, Jamey is taking off one of the attic vents to feed the hose through. He had to crawl up through the little attic access hole in Sam's room to get himself up in there. The gaping hole in the house just below him in the picture is the hole he created to be able to blow insulation into the kitchen's attic (what he's standing on in the picture).
It was a dusty mess but, thankfully, this insulation is made from recycled newspaper, so there are no irritants in it. Jamey used a respirator since he was the one up in the attic spraying, but did not use eye protection because with his glasses it would have been hard to see (our attic is dark to begin with). His eyes were a little irritated afterwards, but nothing like how fiberglass insulation would have made them. He also wore a headlamp so he could see better.
The whole project took about 2 hours from start to finish not counting the added time you'll want to consider if you accidentally step through the attic floor and into your bedroom. It's okay, Jamey. It happens to the best of us:-). Other than having to deal with that little mishap the project was relatively easy and is only a two-person job- one person to keep feeding the insulation into the hopper which blows it up the hose and one person to hold the hose and shoot the insulation around in the attic.
This project will not only keep us warmer in the winter, but also keep our house COOLER in the summer as well. In old farmhouses without AC, you KNOW how important this is if you live in one.
Need insulation? Go for it! Pin It
Heating Our House: The Problems
Heating Our House: The Inspection and Results
Heating Our House: Wood Stove or Outdoor Furnace?
Heating Our House: The Decision
Well. We finally got around to our last big insulating project the other weekend when Jamey's parent's were here (Thank you, Dad!). Our attic had only about 5 inches of blown insulation in it which equals an R-value of about 15. New homes require and R-value of 39 (in our area). Hmm. We were {obviously} a little lacking.
With the project finished, our new R-value is about 40 ( about 12 inches thick). Jamey and his dad also blew insulation into our kitchen's attic (the only one-story portion of the house).
At our local Lowe's store, if you buy a certain number of bales of loose insulation, they let you borrow (yes, for free) the machine complete with hose that you use to blow it in. For our job(s), we used 35 bales. Below, Jamey is taking off one of the attic vents to feed the hose through. He had to crawl up through the little attic access hole in Sam's room to get himself up in there. The gaping hole in the house just below him in the picture is the hole he created to be able to blow insulation into the kitchen's attic (what he's standing on in the picture).
in action
It was a dusty mess but, thankfully, this insulation is made from recycled newspaper, so there are no irritants in it. Jamey used a respirator since he was the one up in the attic spraying, but did not use eye protection because with his glasses it would have been hard to see (our attic is dark to begin with). His eyes were a little irritated afterwards, but nothing like how fiberglass insulation would have made them. He also wore a headlamp so he could see better.
The whole project took about 2 hours from start to finish not counting the added time you'll want to consider if you accidentally step through the attic floor and into your bedroom. It's okay, Jamey. It happens to the best of us:-). Other than having to deal with that little mishap the project was relatively easy and is only a two-person job- one person to keep feeding the insulation into the hopper which blows it up the hose and one person to hold the hose and shoot the insulation around in the attic.
This project will not only keep us warmer in the winter, but also keep our house COOLER in the summer as well. In old farmhouses without AC, you KNOW how important this is if you live in one.
Need insulation? Go for it! Pin It
Labels:
Heating Our House
Monday, February 13, 2012
Heating Our House: The Decision
Heating Our House: The Problems
Heating Our House: The Inspection & Results
Heating Our House: Wood Stove or Outdoor Furnace?
Well, folks. Not only did we decide but once the decision was made, we couldn't wait until summer to stop paying for oil and start heating with wood. The comments you all left regarding your experiences were so interesting and helpful. We were already burning wood when I published that post, but we really wanted to hear your experiences and have you share them with each other. I hope you aren't offended. We honestly weren't trying to be misleading, we had just gotten ahead of ourselves (and my ability to post instantaneously).
When it came down to it, we realized that we are more "wood stove people" than we are "outdoor furnace people". I really have no idea what "outdoor furnace people" are like, but we did know that we would love having the stove inside. Friends and family (and commenters) warned us of the mess that having wood indoors can make, but after burning wood inside now for a month, I can honestly say there is very little mess and what little is there doesn't bother us at all. Jamey is very conscientious when he hauls it in and the ash out, the wood box contains mess well and only an occasional use of the little stove brush and shovel is required every day or so to keep it looking tidy. There is more dust in the room where the stove is and it decorates the cobwebs nicely, making them more visible. But this is a plus! Now I can actually see them:-).
We bought a new stove (for efficiency purposes). The size was recommended based on our 1900 square foot home. We had it professionally installed for peace of mind. Our chimneys would have required rebuilding, so we opted to have a stove pipe go up through the house. Above the living room, the stove pipe runs up through a closet and then up through the attic and out the roof. The stove is positioned on the first floor, in the living room, right beside the play/school room door which is where we spend most of our time in the winter (doing school). These two rooms stay very comfortable (between 70 and 76 on the coldest days, up to 80 if the weather is mild and we let it) while the other rooms downstairs are on the cool side (low to mid 60s in the morning, climbing to 70 on sunny days-- way better than mid 50s with oil heat). Heat rises nicely up the stairs at the other end of the living room, keeping the kids rooms comfortable. Our bedroom, which is back a hallway upstairs is cooler, but perfect
sleeping temperature.
Reversing the ceiling fan in the living room helps to spread out the heat into the kitchen and dining room on days we want to spend more time in those rooms. In those rooms, I'm more comfortable with a sweatshirt on, but the wood heat still feels significantly warmer than the oil. In the living room and school room, just long sleeves or even short sleeves (!) are most comfortable.
With newer stoves, more attention is required to keeping your fire in the temperature zone that will allow the smoke in the stove to be burned as well (secondary combustion) so creosote levels are kept to a minimum. A magnetic stove thermometer that clings to the stove pipe or stove top allows us to watch this. This takes practice and we're learning that building smaller, hot fires allows us to keep it in the zone without having to cut back on the air. Burning a larger fire leads to a fire that's too hot. This requires you to cut back on the air and you end up with more of a smoldering fire (which does happen overnight when you can't watch it) but which can keep your fire from being hot enough to burn off the creosote.
There's an art to it all for sure, but it's a really fun art that is rewarding both in knowing we are off oil and can keep our family warm and toasty even if the lights go out. The smell of wood burning when the door is opened makes it seem like we're living with a camp fire (which we love). At this point, we're choosing to buy our wood, happy to help out local farmers and construction folks who need the extra money over the winter.
I wondered about having the kids around the fire. I knew Sam (9) and Sadie (6) would keep their distance, but even Miriam (2 and a half) has done great. She ignores the stove, while the other two cozy up to it to read books or to get warm in the morning while the rest of the house is cool. The screen helps them keep their distance and we have a no running/wrestling in the living room rule. A baby gate is placed in the doorway between the play room and living room when we have company with toddlers or excitable kids that may not yet be used to us having a stove just inside the living room.
Jamey is an early riser (naturally and due to his work schedule) so he builds the first fire in the morning, making sure it's not too hot (and therefore requires watching). By the time we come downstairs, it's warming up nicely. I usually put more wood on around 10:30 or so and again around 1 or 2 in the afternoon. When he gets home around 4 or 5, it's ready for another helping. Often, in the evenings, we build it up again to keep us toasty in that room, then larger logs are placed on the fire and the air is cut back to let it burn overnight (without the risk of it getting too hot). In the morning, there are always plenty of hot coals and new logs ignite quickly.
We are so happy about our decision. In the past, we've, in many ways, dreaded winter. It meant being cold and still having to pay large oil bills (last winter we spent $1900 on oil). Now, winter is pretty fun. We enjoy building fires, being warm and stacking wood. And we don't miss the oil truck one bit.
Sometimes we just look at each other and grin (all goofy-like) because the house is warm, because we are warm, because we're heating with wood, and because it just feels like us.
Speaking of houses and heating them, remember my friend who was building a green (not the color, sillies) house in New Hampshire? Well, she wrote an excellent post about life two years in. (Don't forget to check out the back posts about the building process). Pin It
Heating Our House: The Inspection & Results
Heating Our House: Wood Stove or Outdoor Furnace?
Well, folks. Not only did we decide but once the decision was made, we couldn't wait until summer to stop paying for oil and start heating with wood. The comments you all left regarding your experiences were so interesting and helpful. We were already burning wood when I published that post, but we really wanted to hear your experiences and have you share them with each other. I hope you aren't offended. We honestly weren't trying to be misleading, we had just gotten ahead of ourselves (and my ability to post instantaneously).
When it came down to it, we realized that we are more "wood stove people" than we are "outdoor furnace people". I really have no idea what "outdoor furnace people" are like, but we did know that we would love having the stove inside. Friends and family (and commenters) warned us of the mess that having wood indoors can make, but after burning wood inside now for a month, I can honestly say there is very little mess and what little is there doesn't bother us at all. Jamey is very conscientious when he hauls it in and the ash out, the wood box contains mess well and only an occasional use of the little stove brush and shovel is required every day or so to keep it looking tidy. There is more dust in the room where the stove is and it decorates the cobwebs nicely, making them more visible. But this is a plus! Now I can actually see them:-).
Jamey re-purposed an old hog shed into our wood shed. Sam stacked much of this wood with Jamey.
We bought a new stove (for efficiency purposes). The size was recommended based on our 1900 square foot home. We had it professionally installed for peace of mind. Our chimneys would have required rebuilding, so we opted to have a stove pipe go up through the house. Above the living room, the stove pipe runs up through a closet and then up through the attic and out the roof. The stove is positioned on the first floor, in the living room, right beside the play/school room door which is where we spend most of our time in the winter (doing school). These two rooms stay very comfortable (between 70 and 76 on the coldest days, up to 80 if the weather is mild and we let it) while the other rooms downstairs are on the cool side (low to mid 60s in the morning, climbing to 70 on sunny days-- way better than mid 50s with oil heat). Heat rises nicely up the stairs at the other end of the living room, keeping the kids rooms comfortable. Our bedroom, which is back a hallway upstairs is cooler, but perfect
sleeping temperature.
The shiny, new stove pipe and two of our ancient chimneys (the openings of which are the size of a single brick).
Reversing the ceiling fan in the living room helps to spread out the heat into the kitchen and dining room on days we want to spend more time in those rooms. In those rooms, I'm more comfortable with a sweatshirt on, but the wood heat still feels significantly warmer than the oil. In the living room and school room, just long sleeves or even short sleeves (!) are most comfortable.
Preparing the location (just between the play/school room and living room).
With newer stoves, more attention is required to keeping your fire in the temperature zone that will allow the smoke in the stove to be burned as well (secondary combustion) so creosote levels are kept to a minimum. A magnetic stove thermometer that clings to the stove pipe or stove top allows us to watch this. This takes practice and we're learning that building smaller, hot fires allows us to keep it in the zone without having to cut back on the air. Burning a larger fire leads to a fire that's too hot. This requires you to cut back on the air and you end up with more of a smoldering fire (which does happen overnight when you can't watch it) but which can keep your fire from being hot enough to burn off the creosote.
I wondered about having the kids around the fire. I knew Sam (9) and Sadie (6) would keep their distance, but even Miriam (2 and a half) has done great. She ignores the stove, while the other two cozy up to it to read books or to get warm in the morning while the rest of the house is cool. The screen helps them keep their distance and we have a no running/wrestling in the living room rule. A baby gate is placed in the doorway between the play room and living room when we have company with toddlers or excitable kids that may not yet be used to us having a stove just inside the living room.
Sometimes we just look at each other and grin (all goofy-like) because the house is warm, because we are warm, because we're heating with wood, and because it just feels like us.
Speaking of houses and heating them, remember my friend who was building a green (not the color, sillies) house in New Hampshire? Well, she wrote an excellent post about life two years in. (Don't forget to check out the back posts about the building process). Pin It
Labels:
Heating Our House
Monday, January 23, 2012
Heating Our House: Wood Stove or Outdoor Furnace?
Heating Our House: The Problems
Heating Our House: The Inspection & Results
Once we felt likewe Jamey had most of the tightening up projects done or planned, our thoughts turned (naturally) to how we would heat the house. Our goal was to implement the plan this summer so we'd be ready to ditch the oil heat by next winter.
But deciding proved to be quite the process. We knew we wanted to heat with wood (surprise, surprise) but the question was how. We needed to decide between an outdoor furnace and an indoor wood stove (we do not have a fireplace in spite of our three chimneys). There were pros and cons to each choice and they really balanced each other out (in our minds), so deciding was tough. Here are things we considered...
Outdoor Furnace
~ larger pieces and more junk-type wood could be used, making for less cost as well as less work cutting and splitting
~ all the wood mess would remain outside
~ no chimney is required
~ our existing duct work would be used, so heat would be blown into all rooms (as it was with oil heat)
~ the hot water generated by the furnace could be used to help heat our water, so less electricity for hot water would be used
~ our homeowner's insurance would not be affected if the stove passed inspection
~ the furnace would require electricity to function (to blow the hot air into the house)
~ if the electricity went out, we would have no heat
~ the fire is outside the house (less chance of a house fire)
~ a thermostat would still be used to control the temperature in the house
~ the furnace would need loading only once or twice a day (per a friend who has one)
(photo credit)
Wood Stove
~ quality wood (both in species, size and moisture content) would be required (to prevent the build up of creosote in the chimney) which would increase the cost of the wood
~ would require us to repair or rebuild (if possible) one of our old chimneys or have a stove pipe installed up through the house
~ heat would likely not be even throughout the house
~ we would always have at least one warm room
~ it would need to be fed more often throughout the day
~ requires no electricity to operate
~ if our electricity went out, we could still heat the house and boil water/heat food on the stove
~ we wouldn't have "blown" air anymore, allowing for a warmer feeling
~ wood "mess" would be inside due to loading the stove and bringing wood in from outside
~ temperature would be regulated by feeding the fire (and outdoor temps) versus a thermostat so we would not know for sure how it would heat the house until it is installed
~ there would be the risk (albeit small if we're conscientious) of chimney fire
~ our homeowner's insurance would not be affected if the stove passed inspection
~ we would enjoy the ambiance of a wood stove
~ air quality might be an issue (both in moisture content and unknown potential allergies)
~ the cost of the stove could be as much as half that of an outdoor furnace
(photo credit)
Now, I can't promise that we'll listen to you, but we are incredibly curious what you all think. Do you heat with wood? Do you have an outdoor furnace or wood stove? How do you like it?
Given the points above, which would you choose?
Heating Our House: The Decision Pin It
Heating Our House: The Inspection & Results
Once we felt like
But deciding proved to be quite the process. We knew we wanted to heat with wood (surprise, surprise) but the question was how. We needed to decide between an outdoor furnace and an indoor wood stove (we do not have a fireplace in spite of our three chimneys). There were pros and cons to each choice and they really balanced each other out (in our minds), so deciding was tough. Here are things we considered...
Outdoor Furnace
~ all the wood mess would remain outside
~ no chimney is required
~ our existing duct work would be used, so heat would be blown into all rooms (as it was with oil heat)
~ the hot water generated by the furnace could be used to help heat our water, so less electricity for hot water would be used
~ our homeowner's insurance would not be affected if the stove passed inspection
~ the furnace would require electricity to function (to blow the hot air into the house)
~ if the electricity went out, we would have no heat
~ the fire is outside the house (less chance of a house fire)
~ a thermostat would still be used to control the temperature in the house
~ the furnace would need loading only once or twice a day (per a friend who has one)
(photo credit)
Wood Stove
~ quality wood (both in species, size and moisture content) would be required (to prevent the build up of creosote in the chimney) which would increase the cost of the wood
~ would require us to repair or rebuild (if possible) one of our old chimneys or have a stove pipe installed up through the house
~ heat would likely not be even throughout the house
~ we would always have at least one warm room
~ it would need to be fed more often throughout the day
~ requires no electricity to operate
~ if our electricity went out, we could still heat the house and boil water/heat food on the stove
~ we wouldn't have "blown" air anymore, allowing for a warmer feeling
~ wood "mess" would be inside due to loading the stove and bringing wood in from outside
~ temperature would be regulated by feeding the fire (and outdoor temps) versus a thermostat so we would not know for sure how it would heat the house until it is installed
~ there would be the risk (albeit small if we're conscientious) of chimney fire
~ our homeowner's insurance would not be affected if the stove passed inspection
~ we would enjoy the ambiance of a wood stove
~ air quality might be an issue (both in moisture content and unknown potential allergies)
~ the cost of the stove could be as much as half that of an outdoor furnace
(photo credit)
Now, I can't promise that we'll listen to you, but we are incredibly curious what you all think. Do you heat with wood? Do you have an outdoor furnace or wood stove? How do you like it?
Given the points above, which would you choose?
Heating Our House: The Decision Pin It
Labels:
Heating Our House
Monday, January 16, 2012
Heating Our House: The Inspection & Results
In case you missed it, here is the first installment in this series...Heating Our House: The Problems
Our friend showed up on a cold day in early December and commenced his inspection. This was fascinating. First, he had us shut off the heat. Next, he propped open the back storm door and placed in the doorway a special frame with adjustable sides so it would fit the opening of our back door perfectly. Across this frame was stretched tarp-like material, with a very large hole at the bottom of the frame near the floor. In the hole (on the floor), he set a large circular fan, aiming it outside.
Then, he turned on the fan.
The fan pulled outside air in through all the cracks and crevices of our house and then blew it outside again. Can you picture it? Needless to say, it soon got very cold in our house. Next came the really cool part. He had with him an infrared camera that could be pointed anywhere in the house and SHOW us where the cold spots were (where the most cold air was seeping in) - those areas showed up dark purple. The camera could be held like a gun, so he and Jamey took turns pointing the camera over all the areas of each room in our house, noting the spots where significant leakage was occurring. The cold spots could also be discovered by focusing a point on the camera to read the temperature in specific spots.
I followed them around, making notes as he told Jamey the best ways of remedying the holes. He also suggested Jamey use little pieces of blue painter's tape that he had brought along to mark certain cold spots (so we wouldn't forget about them). We moved through each and every room of the house this way and then he and Jamey went up in the attic and down under the house.
Looking at our house through this camera was sobering and overwhelming, but it also gave us hope. Most of the remedies would be relatively inexpensive to carry out. While we thought that our remaining old windows and old doors would be major culprits, they really weren't. Our combinations of storm windows on the outside and plastic on the inside made them semi-comparable to our newer windows although some better weather stripping was needed.
And, while we were worried that most of the walls were uninsulated, we discovered (via the camera) that only relatively small portions were without insulation (at some point, one of the owners had insulation blown into the walls).
The major culprits were these...
1) We had major leakage under the baseboards on all the outer walls, both upstairs and down. Evidently, in these old house, care was not taken to seal together where the walls and floors joined. Baseboards that don't sit flush to the floor (nearly impossible with our old, hardwood floors), leave ample space for heat to escape. This problem was even noticeable in the upstairs, carpeted rooms.
Thankfully, fixing this problem is simple and involves caulking under the baseboards or removing them to insert expanding foam, insulation board or ample caulk.
2) Outlets, recessed lighting openings and heating vents also proved to be major leakage points as well.
Did you know they sell these thin, foam insulation plates to place behind your outlets and energy star casings for recessed lighting? Caulking the seals of heating vents keep cold air from our attic or basement from finding it's way into the house around the duct openings.
3) In our house, the heating duct work is almost entirely under the house (blowing up through the floor) and in the attic (blowing down through the ceiling) except for the duct that takes it from the basement into the attic up through the center of the house (next to one of the old chimneys). All this duct work was lacking seals at the seams and insulation, leaving in some areas, significant openings where the duct was bent or twisted and therefore didn't fit/seal properly into the next section of duct work.
Foil tape seals the seams and insulation boards cut to fit or spray foam to cover the ducts will prevent precious heat from sneaking out and into the cold basement (actually crawl spaces and cellar, in our case) and attic.
4) We needed an additional 7 inches of insulation in our attic in addition to the 6 inches we already have. Jamey has plans to blow this in himself sometime this winter.
5) Trim surrounding doors and windows needed caulking (to the doors/windows, the walls and adjoining trim pieces) and some weather stripping needed updating.
6) The wood hallway floor upstairs proves to be very cold to the touch. When the fan was turned on and was sucking air in from the outside, it was amazing to feel cold, rushing air coming into the house through multiple knot holes in the wood flooring. The inspector surmised that this section of our second story was likely channeling cold, outside air in through where our front porch roof is attached to the front of our house.
Jamey removed portions of the ceiling of the front porch roof and used spray foam insultaion to seal the area where porch and house adjoin.
Having the inspector spend three hours with us to show us all these issues was well worth the $300 it cost. $300 is a lot of money, but I hate to think how much we've wasted by heating the outside. While some of you may not be able to afford this type of inspection, my hope is that this outline of our trouble spots and the solutions will inspire you to tighten up your own house. All of us who live in drafty houses know those spots where we feel a little breeze when we pass by. Taking the time, on a windy day, to identify those spots and do something about them will lead to savings on your heating bills. And who doesn't want that?
Jamey has (obviously) been very busy caulking and insulating. Some might possibly call it an obsession, but hey. It's productive and will lead to savings and a warmer house. The next installment in this series will look at the new heating options we were considering (with their pros and cons, in our opinion) and what we decided to do. Stay tuned! Pin It
Our friend showed up on a cold day in early December and commenced his inspection. This was fascinating. First, he had us shut off the heat. Next, he propped open the back storm door and placed in the doorway a special frame with adjustable sides so it would fit the opening of our back door perfectly. Across this frame was stretched tarp-like material, with a very large hole at the bottom of the frame near the floor. In the hole (on the floor), he set a large circular fan, aiming it outside.
Then, he turned on the fan.
The fan pulled outside air in through all the cracks and crevices of our house and then blew it outside again. Can you picture it? Needless to say, it soon got very cold in our house. Next came the really cool part. He had with him an infrared camera that could be pointed anywhere in the house and SHOW us where the cold spots were (where the most cold air was seeping in) - those areas showed up dark purple. The camera could be held like a gun, so he and Jamey took turns pointing the camera over all the areas of each room in our house, noting the spots where significant leakage was occurring. The cold spots could also be discovered by focusing a point on the camera to read the temperature in specific spots.
I followed them around, making notes as he told Jamey the best ways of remedying the holes. He also suggested Jamey use little pieces of blue painter's tape that he had brought along to mark certain cold spots (so we wouldn't forget about them). We moved through each and every room of the house this way and then he and Jamey went up in the attic and down under the house.
Looking at our house through this camera was sobering and overwhelming, but it also gave us hope. Most of the remedies would be relatively inexpensive to carry out. While we thought that our remaining old windows and old doors would be major culprits, they really weren't. Our combinations of storm windows on the outside and plastic on the inside made them semi-comparable to our newer windows although some better weather stripping was needed.
And, while we were worried that most of the walls were uninsulated, we discovered (via the camera) that only relatively small portions were without insulation (at some point, one of the owners had insulation blown into the walls).
The major culprits were these...
1) We had major leakage under the baseboards on all the outer walls, both upstairs and down. Evidently, in these old house, care was not taken to seal together where the walls and floors joined. Baseboards that don't sit flush to the floor (nearly impossible with our old, hardwood floors), leave ample space for heat to escape. This problem was even noticeable in the upstairs, carpeted rooms.
Thankfully, fixing this problem is simple and involves caulking under the baseboards or removing them to insert expanding foam, insulation board or ample caulk.
2) Outlets, recessed lighting openings and heating vents also proved to be major leakage points as well.
3) In our house, the heating duct work is almost entirely under the house (blowing up through the floor) and in the attic (blowing down through the ceiling) except for the duct that takes it from the basement into the attic up through the center of the house (next to one of the old chimneys). All this duct work was lacking seals at the seams and insulation, leaving in some areas, significant openings where the duct was bent or twisted and therefore didn't fit/seal properly into the next section of duct work.
Foil tape seals the seams and insulation boards cut to fit or spray foam to cover the ducts will prevent precious heat from sneaking out and into the cold basement (actually crawl spaces and cellar, in our case) and attic.
4) We needed an additional 7 inches of insulation in our attic in addition to the 6 inches we already have. Jamey has plans to blow this in himself sometime this winter.
5) Trim surrounding doors and windows needed caulking (to the doors/windows, the walls and adjoining trim pieces) and some weather stripping needed updating.
Having the inspector spend three hours with us to show us all these issues was well worth the $300 it cost. $300 is a lot of money, but I hate to think how much we've wasted by heating the outside. While some of you may not be able to afford this type of inspection, my hope is that this outline of our trouble spots and the solutions will inspire you to tighten up your own house. All of us who live in drafty houses know those spots where we feel a little breeze when we pass by. Taking the time, on a windy day, to identify those spots and do something about them will lead to savings on your heating bills. And who doesn't want that?
Jamey has (obviously) been very busy caulking and insulating. Some might possibly call it an obsession, but hey. It's productive and will lead to savings and a warmer house. The next installment in this series will look at the new heating options we were considering (with their pros and cons, in our opinion) and what we decided to do. Stay tuned! Pin It
Labels:
Heating Our House
Friday, January 6, 2012
Heating Our House: The Problems
We've been living in this old house of ours for just shy of seven years. The original portion of this house is thought to have been built in the 1890's, making part of this house well over 100 years old. There are two energy-related issues about this house that we haven't liked ever since we've moved in.
One, it's heated with oil (forced air). Two, it's like living in swiss cheese- the house is drafty, drafty, drafty- hotter than necessary in summer and colder than need be in the winter. Also, the temperature extremes within the house are comical. The living room thermostat can read 68 degrees while the temperature in the kitchen (on the opposite side of the house, both on the first floor) can read 52 degrees. And you wonder why I bake.
Relatively soon after moving in, we replaced 20 out of the 25 windows. This helped quite a bit and made actually opening and closing the windows as well as cleaning them much easier. It also meant less storm windows to deal with. Over the years, Jamey has worked off and on at insulating some of the trouble spots, but, oh, what giant project to tackle.
We knew once Jamey was out of school we wanted to think more seriously about improving the two major beefs we have with this house. We want to save money and live more sustainably. We have had countless discussions on the topic over the years with an incredible increase in frequency and duration in the past few months as we saw another winter looming.
Before making a decision about heating the house, we needed to get the house ready by tightening it up as best we can. I say "we", but of course I am referring to Jamey. It's not as if I don't want to help, it's just that he's so much better at it than I and someone needs to watch the three little ninnies that live here with us.
The first step of this process was a no-brainer for us. We wanted an expert to come in here and show us the holes, show us what we needed to do to insulate and tighten up the house. Who wants to set up a new heating system only to help heat the outside? The husband of a friend of mine is a building inspector and has become certified energy auditor (specifically, a RESNET Energy Rater). We gave him a call, asking that he come show us what we might not want to see but knew we needed to.
And show us, he did.
I'm so sorry to tease, but you'll have to come back for the next installment of "Heating Our House" to find out what happened next. Pin It
Labels:
Heating Our House
Subscribe to:
Posts (Atom)